Finally Some Progress

8 10 2012

So I finally had some time to work on the car.  Yay! I’ve just about got it completely stripped and ready for the cage (I think).

I removed all the glass, minus the windshield of course.

Also removed the rear window.  And by removed I mean broke accidentally.  That thing was a pain.  I had to use my flat bar and mallet to remove the adhesive.

Used the saw to cut out the doors in order to make room for the cage door bars.

Dashboard removed!

Sunroof is gone

Trunk all stripped:

Now I just have to figure a few things out about the heater and A/C unit, get them out.  Clean up some wires and get her to the cage builder.  Also need to change out the ball joints and stuff.  I still haven’t replaced those yet.  The parts have been sitting in my garage for a couple of months though.

Anyway, figured it was about time for an update.

Stay tuned!


Special Delivery!

29 06 2012

The FedEx delivery man brought me some goodness today!

From left to right: Purolator oil filter, 2 MOOG front outer tie-rod ends, 1 MOOG front lower ball joint (still waiting on the other), and 2 Beck Arnley upper control arms with bushings.  Once the other lower ball joint gets here I will work on installing these.  Hopefully I can get it started before I leave on the 9th for training for my new job.

Stay tuned!


Carpet Gone!

29 06 2012

I worked on the car for about an hour last night, and I removed the gross carpet.  I probably should have worn a mask, because man that stuff was nasty.  It was wet in places too.  Under the carpet in the foot-well behind the driver’s seat I found enough sand to build a sand box?!?  Hopefully this car was never flooded, but it was probably wet from a leaky sunroof.

I also removed the door panels, visors, oh-crap handles, interior lights, and pulled the head liner out.  The sunroof is about ready to come out.

I tried to sweep it out with a broom, but I need a shop-vac or vacuum to get all that dirt and nastiness out.

It was 101 degrees yesterday, and its supposed to be even hotter today and tomorrow, so I doubt I will work on the car (or do anything outside for that matter).  We will see.

Stay tuned!


Strip Work Begins!

27 06 2012

Today I started stripping.  Thank God it’s not what it sounds like, as I’m sure I wouldn’t make much doing the other thing.  After weighing the car I decided to go ahead and start the strip work.  I only ended up working for about an hour and forty minutes, because my wife had to leave and that meant I would be on kid sitting duty.

First I removed the center console, shift boot, and what was left of the stereo.

Then I worked on removing the seats.  The rear seat gave me a bit of trouble, just cause I had never taken apart anything other than Subaru’s prior to this, so it was a bit different.  But a big pry-bar helped.  The driver’s seat is heavy!  Haven’t weighed it yet, but I estimate about 60 lbs.  Now there is nowhere to sit!


Next I removed the seat belts, window trim, and most of the plastic pillar covers.  She is now ready for carpet removal.

This car was/is filthy.  The kinds of things that were under the seats is almost like a treasure hunt.  Except the kinds of things you find you would have to pay someone to take.  Pencils, pens, gold-fish, screws (drywall screws?), money, cigarettes, asthma inhalers, and all kinds of trash.  Can’t wait to get the carpet and dash out and then clean it a bit.  Then it will be the trunk.

However, the next few days we are expecting record heat, so I probably wont get much done.

Stay tuned!


Weighed the Legend today

27 06 2012

Just got back from weighing the 413 Racing Legend.  I drove the car to a Pilot Travel Center and used the Cat Scales.  Stock weight with 3/8 of a tank of gas, and no driver was 3080 pounds.

I hope once we finish weight reduction and race prep, including the roll cage, that the race weight will be 2600 lbs.  Can we accomplish that?

Stay tuned to find out!


More Brake Work

26 06 2012

Recently my daily driver, a 2001 Jeep Grand Cherokee, has been having some shuttering under braking.  I needed to get it in the garage and get the wheels off and see what was going on.  So that meant I needed to get the Legend off of the jack stands, which meant the brakes needed put back together.

I was having an issue with the right rear caliper when I last worked on the car.  Not really an issue I guess, but the piston on the rear calipers is a screw in type.  It’s pretty difficult getting that piston screwed back in when you need to change brake pads.  I started working on it, then moved on to something else, and eventually forgot about it.  I put all the other rotors on, put the calipers back on the other three corners, tightened everything down, and gave the brake pedal a few pumps to see how it felt.  When I got out and walked over to my tool box, it was then that I realized I hadn’t finished the right rear and the caliper wasn’t attached.  With my previous pumping of the brakes, since there was no rotor for the caliper to clamp on, the piston in the caliper came out and was laying on the floor in a pool of brake fluid.  crap.  Took a bit, but I got it back in properly and screwed in all the way.  Then I decided I needed to bleed the brakes.  Which meant I needed to go to the local auto parts store for more brake fluid, brake cleaner, gloves, and some 1/4″ tubing.

Put back together and ready to bleed:
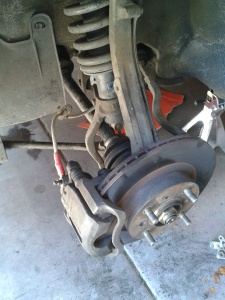
  

Once I got back from the store, I asked my wife if she could help me out (I needed someone to pump the brake pedal).  I followed the sequence in the manual, which is Left Front (LF), Right Rear (RR), Right Front (RF), Left Rear (LR).  I used some cheap DOT3 fluid because I know I am going to be bleeding again when I put race pads on and new rotors before race season, so I figured I would use the good stuff then.

It’s a good thing I bled the brakes.  I have never seen brake fluid so disgusting.  In the front it was a dark red/amber color, and thick.  In the rear it literally looked like chocolate milk with rust in it.  Its amazing stopped when I drove it before.  But now it is all clean and good to go.  The pedal felt nice and firm on the quick test drive.  I can’t wait for the race pads!

After the brake job, and the diagnosing of the Jeeps issues, I decided to clean out my work space a bit.  My parents had been storing some of their stuff in my garage while they were renovating their house.  Now that they have moved everything out, I have space again!  I moved all the stuff that was behind the car, over to the other bay in the shop.  Now my work area is clean and ready for the real work to begin!

All clean & ready to lose some weight (the car that is)


After finishing the days work, I decided to go ahead and order some of the parts I needed.  I ordered everything from Rock Auto.  I ordered:

  1. 2 Front Lower Ball Joints
  2. 2 Front Upper Control Arms with Bushings
  3. 2 Front Outer Tie-Rod Ends
  4. Oil Pump Gasket set
  5. Oil Filter 
  6. Valve Cover Gaskets

I also ordered some other parts for the Jeep.  Once the parts come in I will begin installing them, but in the meantime I am going to start stripping the car.

Stay tuned for more updates!


Front Brakes Get An Upgrade!

30 05 2012

If you read my driver bio on the “The Team” page, then may recall that I autoxed from 2005-2008.  I always raced Subaru’s, and after modifying them all, I accumulated quite a bit of spare parts.  Most of them I sold before I joined the Army.  However, some of them ended up in boxes in my sisters storage shed for 4 years.  In a Motul box that had been made into an ant house, I discovered two boxes of racing brake pads, STi stainless steel brake lines, speed bleeders, some bushings, a stock STi shifter, and a bunch of lug nuts.  I instantly started wondering if I could make those brake lines fit the Legend.

Today I decided to try it out and see if I could make those brake lines fit.  This is what they looked like brand new (mine were not near this pretty since they were about 5-6 years old):

SS Brake Lines

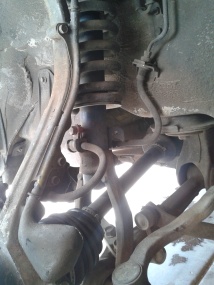
Here are some pictures of the old, crusty rubber brake lines that were on the Legend.

Old junk  Old Junk

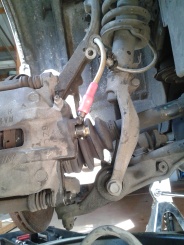
First thing I had to do was use a reciprocating saw to cut a part off of the STi brake lines.  It was a metal piece that stuck out past where the banjo bolt goes through.  It was there for the Brembo brake calipers on the STi, and would only get in the way on the Legend.  So off it went.  There were three metal brackets holding the rubber brake line in place, none of which would work for the new lines, so they were removed too.  You can see which brackets I removed below, they are circled in red:

Brackets are circled in red

I then mounted the STi SS Brake Lines.  I reused the two washers on the banjo bolt since I didn’t have any extras, but they looked pretty decent.  The line was almost the perfect length.  I wanted something to hold it in place so that it wouldn’t rub against the strut too much, and then I noticed one of the brackets I removed may work if I flip it over.  So I tested it, and sure enough if worked great.

Used Bracket

The STi brake lines fit great in the front!  Almost seems like they were made for the Legend haha.  Here are a few more pictures of the finished install.

 SS Brake Lines

I’m not sure if I can get the rear brake lines to fit.  They are made weirdly on the Legend.  It goes from the stainless line > rubber line > stainless line > rubber line > caliper.  My STi lines aren’t quite long enough to make it all the way from the first stainless line to the caliper.  Gotta see what I can do about that.  

Anyway… I still need to bleed the system, but I am going to wait until I figure out the rear brake situation.  However, even just the front upgrade to the stainless brake lines should be a huge improvement.  Especially once I get better rotors and pads.  Plus it makes me feel good knowing that there are STi parts on the car! 🙂


Finding The Right Car & Building AIV

30 05 2012

Perhaps you want to build your own car or start your own team.  Well to do that you need to find the right type of car.  That’s up to you really and what you deem the “right” car.  Do you want front wheel drive (FWD), rear wheel drive (RWD), or all-wheel drive (AWD)?  All have their pro’s and con’s.  Do you want a turbo car, or naturally aspirated?  A coupe or sedan?  Manual transmission or automatic?  Four wheel independent suspension?  Four wheel disc brakes?  There are so many more things to consider when trying to find the “right” car.

But maybe the right car is simply a car under $500 that runs! haha  Ideally you want to start with a running car.  Take a late ’80’s or early ’90’s car, one that has about 160k miles on it, and still runs.  You want to keep it as stock as possible so that you can easily get repair parts at the local auto stores (or even junk yards).

One things for sure, it will cost a lot more than $500 to go racing.  A lot more.  Yes this is crapcan racing, where we race $500 cars.  However, that doesn’t include safety items and maintenance parts.  Take that $500 car, add in about $1500-2000 for safety items, another $500 (at least) in maintenance and your already over $2500.  And you haven’t even raced yet!  I’m not trying to deter anyone, just let them know what goes into this crapcan racing.

So you still want to build a team?  Well then its time to find the car.  I recommend using sites like craigslist, www.craiggers.com, www.jaxed.com, carsabi.com, and finally www.autotempest.com. Keep on searching.  Make sure you save the ad from the car that you decide to purchase, that way you can show the judges.

Check out this post to read more on the rules and building AIV: The Rules

Well good luck finding your dream racecar!  Keep checking in here for updates.  If you have any questions, be sure to leave a reply or send me an email.

Thanks!


Donate & Help 413 Racing!

29 05 2012

We added a Paypal Donate button on the sidebar to your right. If you would like to contribute to 413 Racing’s efforts, you can donate as much or little as you like. Any donations are greatly appreciated (seriously, more than you know!)! If you donate to 413 Racing, you will be helping them to prepare their race car and get racing!

The names of those who donate will be placed on the car in vinyl graphics (unless of course you wish to remain anonymous), that way everyone will know that you are a huge part of 413 Racing’s success!  Your name will forever (or at least until the body panel has to be replaced haha) immortalized!

Thank you for your donations!

Steven Kornahus – Car Owner/Driver


The To-Do List!

29 05 2012

So since we can’t start the build quite yet, I have been doing a LOT of research and seeing what others have done to make their cars last throughout an endurance race.   I think I have comprised quite a decent “To-Do List.”  Its going to take a while to get all this done once we start, luckily we have quite a bit of time.   What do you all think of the below list???

TO-DO List:

Remove entire interior!
Remove all glass
Remove sunroof – install sunroof cover
Degrease engine compartment
Tune up: new plugs, wires, filters, gaskets… everything!
Change timing belt, thermostat, all other belts, water pump
Replace oil cooler gasket
Change all fluids – engine, tranny, differential, brake, coolant
Fabricate engine and tranny mounts
Clean out radiator, do a flush.
Replace all hoses with new, and double clamp them
Resolder main relay
Oil Pan baffling or Accusump
Fabricate exhaust, and exhaust exit
Fabricate CAI
Install Roll Cage
Install Seat rails and race seat
Install harness mounting points, and install racing harness
Install Engine kill switch
Install guages: oil temp, oil pressure, water temp, fuel
Install Fuel Cell
Install shift and oil pressure warning lights
Install Fire Extinguisher
Install Stainless Steel brake lines
Use DOT4+ fluid
New OEM brake rotors
Rebuild brake calipers
Fabricate Brake ducts
EBC Yellowstuff or Hawk HP+ front and rear Brake Pads
Cut springs
Fabricate camber plates
Inspect/Replace wheel bearings
Cut holes in the hood to aid in cooling
Add mesh screen in front of radiator and brake ducts
Use tons of zip ties to make everything neat
Tires: Star Specs, RT 615K, Fuzion Hri, BFGOODRICH Sport Comp-2
Install window net, helmet hook
Install and mark tow hook locations
Paint/Graphics application
Install radio/communication harness
Install timer
Remove undercoating